QMK Heatmap Generator
Show key presses coming from:
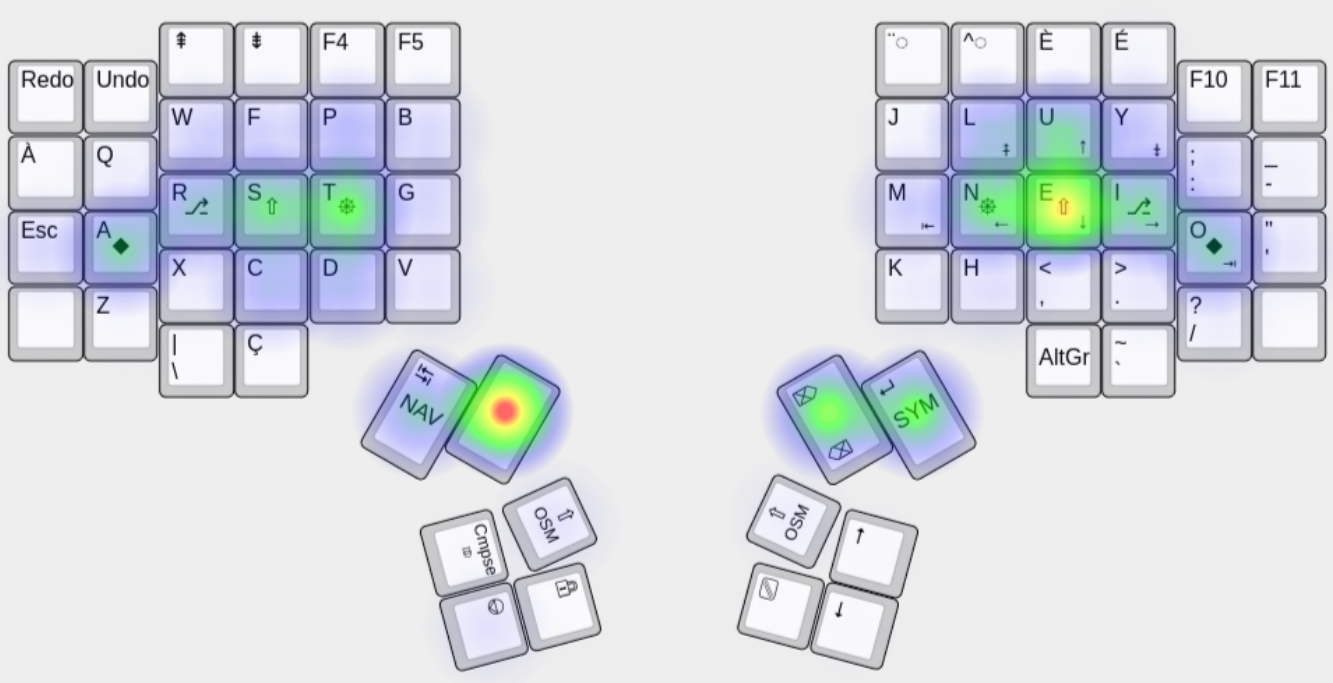
What it is 
This is a web-based tool to generate a pretty heatmap of your typing habits. As opposed to all the other available keyboard heatmap generators, this doesn’t merely analyse a static piece of text and overlays the letter frequency of said piece of text over a picture of the most basic row-stagger keyboard. This generator has full support for unprintable keys like backspace, modifier keys, caps lock, F-keys, arrow keys etc. Additionally, advanced QMK features such as layers, modtaps, layertaps, home row mods, leader keys, autoshift, and even combos are also supported.
Since QMK keyboards come in all shapes and sizes, you’re invited to upload your own picture of your layout/keymap. It doesn’t matter whether you use a TKL, an Atreus or a Dactyl Manuform; if it’s available on the QMK configurator, it’s supported.
Gallery 
Instructions 
The QMK Heatmap Generator expects:
- A picture of your layout
- A text representation of the matrix positions of your keyboard
- A link between each key in the matrix to the corresponding key in the provided picture
- A keylog CSV file in
keycode,row,col,layerformat (keycodecan be omitted)
If you don’t have a keylog.csv file yet, jump to the section on “How to collect the required data”. It is pointless to go through steps 1–3 if you don’t already have a keylog.csv file that contains at least 1000 entries.
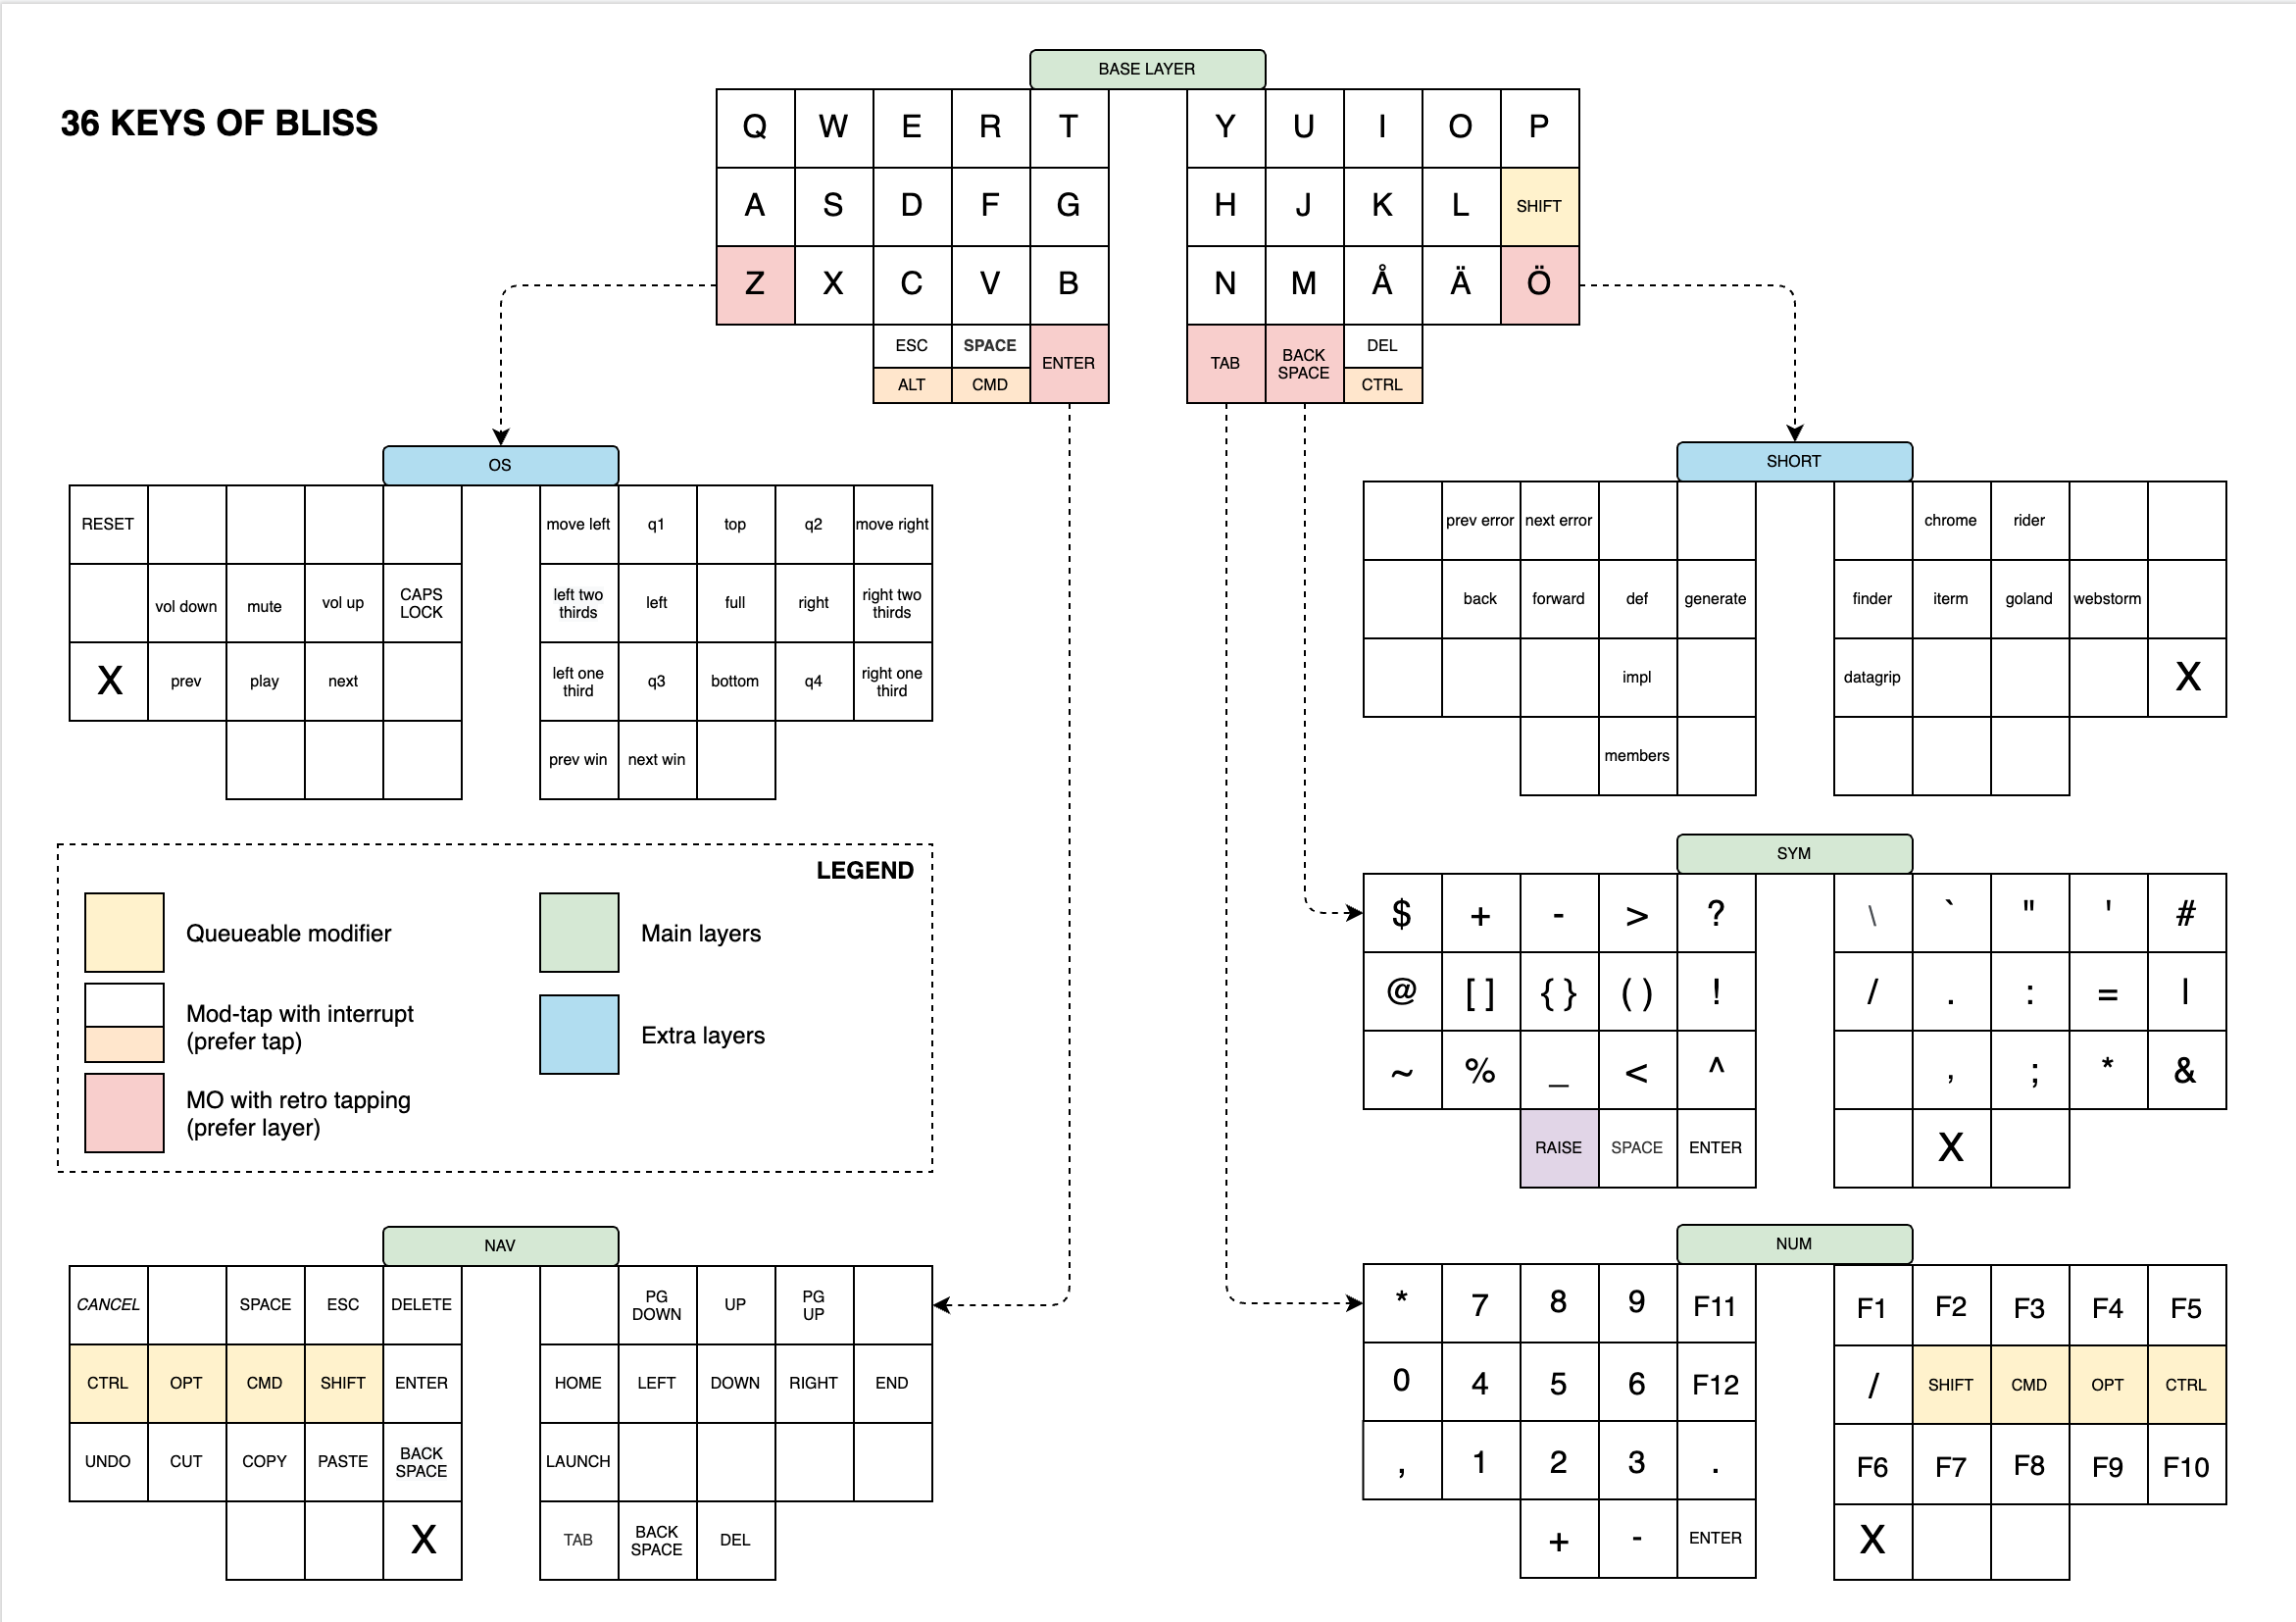
1. A picture of your layout 
The first thing you need to do is to upload a picture of your layout. It can be any image you want but for best effects, I recommend a 2D black and white picture with high contrast. Avoid blue, green, yellow, and red in your layout graphic as those are used to draw the heatmap. If you don’t already have a graphic representation of your keymap, you can use keyboard-layout-editor or take a screenshot from the QMK configurator.
Avoid uploading a picture which separates all your different layers like in this example. You only get to match as many keys as you have submitted in the text box for the ASCII representation of your board.
2. A text representation of the matrix positions of your keyboard 
Next, you can see a text box prompting you to paste the text representation of the matrix layout produced by qmk info --matrix, or qmk info -m in short. If you wish to obtain the pseudo-graphic layout for another board than your main (as defined by qmk config), you can run qmk info -kb <name> -m. For example, qmk info -kb handwired/dactyl -m produces the following output:
Keyboard Name: Dactyl
Manufacturer: Unknown
Website:
Maintainer: QMK Community
Keyboard Folder: handwired/dactyl
Layouts: LAYOUT_dactyl
Size: 17 x 8
Processor: atmega32u4
Bootloader: halfkay
Matrix for "LAYOUT_dactyl":
┌──┐┌──┐┌──┐┌──┐┌──┐┌──┐                    ┌──┐┌──┐┌──┐┌──┐┌──┐┌──┐
│0A││0B││0C││0D││0E││0F│                    │0G││0H││0I││0J││0K││0L│
└──┘└──┘└──┘└──┘└──┘└──┘                    └──┘└──┘└──┘└──┘└──┘└──┘
┌──┐┌──┐┌──┐┌──┐┌──┐┌──┐                    ┌──┐┌──┐┌──┐┌──┐┌──┐┌──┐
│1A││1B││1C││1D││1E││1F│                    │1G││1H││1I││1J││1K││1L│
└──┘└──┘└──┘└──┘└──┘└──┘                    └──┘└──┘└──┘└──┘└──┘└──┘
┌──┐┌──┐┌──┐┌──┐┌──┐┌──┐                    ┌──┐┌──┐┌──┐┌──┐┌──┐┌──┐
│2A││2B││2C││2D││2E││2F│                    │2G││2H││2I││2J││2K││2L│
└──┘└──┘└──┘└──┘└──┘└──┘                    └──┘└──┘└──┘└──┘└──┘└──┘
┌──┐┌──┐┌──┐┌──┐┌──┐┌──┐                    ┌──┐┌──┐┌──┐┌──┐┌──┐┌──┐
│3A││3B││3C││3D││3E││3F│                    │3G││3H││3I││3J││3K││3L│
└──┘└──┘└──┘└──┘└──┘└──┘                    └──┘└──┘└──┘└──┘└──┘└──┘
┌──┐┌──┐┌──┐┌──┐┌──┐                            ┌──┐┌──┐┌──┐┌──┐┌──┐
│4A││4B││4C││4D││4E│                            │4H││4I││4J││4K││4L│
└──┘└──┘└──┘└──┘└──┘                            └──┘└──┘└──┘└──┘└──┘
                        ┌──┐┌──┐    ┌──┐┌──┐
                        │5F││5A│    │5L││5G│
                        └──┘└──┘    └──┘└──┘
                    ┌──┐┌──┐┌──┐    ┌──┐┌──┐┌──┐
                    │5D││5C││5E│    │5H││5J││5I│
                    │  ││  │└──┘    └──┘│  ││  │
                    │  ││  │┌──┐    ┌──┐│  ││  │
                    │  ││  ││5B│    │5K││  ││  │
                    └──┘└──┘└──┘    └──┘└──┘└──┘
Only copy-paste the lines after “Matrix for …”.
Note: for a handwired board, there is the possibility that the actual wiring of your board differs from that of the matrix qmk info -m spits out. Double check that if you notice a key you rarely press gets colored in bright colors.
3. A link between each key in the matrix to the corresponding key in the provided picture 
After pasting the matrix into the text area, left click on the picture the spot that corresponds to each key in the text matrix starting from the top left corner and moving from left to right, top to bottom.
Watch out for columnar staggered boards like the Lily 58. The web-tool reads in the matrix line by line so the following matrix:
            ┌──┐                                  ┌──┐
        ┌──┐│0D│┌──┐┌──┐                  ┌──┐┌──┐│5C│┌──┐
┌──┐┌──┐│0C│└──┘│0E││0F│                  │5A││5B│└──┘│5D│┌──┐┌──┐
│0A││0B│└──┘┌──┐└──┘└──┘                  └──┘└──┘┌──┐└──┘│5E││5F│
└──┘└──┘┌──┐│1D│┌──┐┌──┐                  ┌──┐┌──┐│6C│┌──┐└──┘└──┘
┌──┐┌──┐│1C│└──┘│1E││1F│                  │6A││6B│└──┘│6D│┌──┐┌──┐
│1A││1B│└──┘┌──┐└──┘└──┘                  └──┘└──┘┌──┐└──┘│6E││6F│
└──┘└──┘┌──┐│2D│┌──┐┌──┐                  ┌──┐┌──┐│7C│┌──┐└──┘└──┘
┌──┐┌──┐│2C│└──┘│2E││2F│                  │7A││7B│└──┘│7D│┌──┐┌──┐
│2A││2B│└──┘┌──┐└──┘└──┘┌──┐          ┌──┐└──┘└──┘┌──┐└──┘│7E││7F│
└──┘└──┘┌──┐│3D│┌──┐┌──┐│4F│          │8A│┌──┐┌──┐│8D│┌──┐└──┘└──┘
┌──┐┌──┐│3C│└──┘│3E││3F│└──┘          └──┘│8B││8C│└──┘│8E│┌──┐┌──┐
│3A││3B│└──┘    └──┘└──┘                  └──┘└──┘    └──┘│8F││9F│
└──┘└──┘  ┌──┐┌──┐┌──┐  ┌──┐          ┌──┐  ┌──┐┌──┐┌──┐  └──┘└──┘
          │4B││4C││4D│  │4E│          │9B│  │9C││9D││9E│
          └──┘└──┘└──┘  │  │          │  │  └──┘└──┘└──┘
                        │  │          │  │
                        └──┘          └──┘
will read keys in the following order:
Is it annoying? Yes. I’m currently working on a desktop app that makes this process a lot more convenient. In the app, you’ll be able to select a bunch of circles at once, copy, drag and paste them wherever you want, undo and redo previous actions and more, so stay tuned!
If you misclicked or placed the dot a few millimeters away from the true center of the keycap and it’s driving you mad, you can Shift+Left Click anywhere on the canvas to undo the last operation.
Click a final time on the picture after having matched all matrix positions to points on the image to save the matching pairs and finally spawn the button that will let you upload your keylog.csv.
4. Generating a heatmap 
After having collected enough data in the expected format, you can now submit your keylog.csv file (the exact name of the csv file isn’t important) to the above tool in order to generate a pretty heatmap of your typing habits.
A heatmap overlay will appear over the keys as soon as you upload the file.
NOTE: Make sure the keylog file is encoded in UTF-8! Windows may create a UTF-16 file if you pipe the output of hid_listen.
How to collect the required data 
To accurately modelize your typing habits, you first need to collect enough real-word data. The more, the better.
To avoid skewing results, don’t play typing games such monkeytype or typingracer while logging your keystrokes. Typing random strings of words and movie quotes isn’t a good reflection of your actual keyboard usage — unless you’re into competitive typing.
To collect key strokes data in the expected format, there are two things you need to setup:
- Keyboard firmware
- A program that logs what the keyboard firmware sends into a csv file
(The following instructions primarily cater to users of a UNIX environment — sorry Windows users.)
Keyboard firmware setup 
First off, you need to program your keyboard firmware to send your desired information to the host.
To do that, append the following line to rules.mk:
CONSOLE_ENABLE = yes
Next, open keymap.c and add these lines at the top of the file. This will import the uprintf function that we’ll later use, but only if CONSOLE_ENABLE is turned on.
#ifdef CONSOLE_ENABLE
#include "print.h"
#endif
After including print.h, head to the process_record_user function (More info about this function can be found here) and write the #ifdef code block just after the function signature but before the switch statement:
bool process_record_user(uint16_t keycode, keyrecord_t *record) {
    #ifdef CONSOLE_ENABLE
        const bool is_combo = record->event.type == COMBO_EVENT;
        uprintf("0x%04X,%u,%u,%u,%b,0x%02X,0x%02X,%u\n",
             keycode,
             is_combo ? 254 : record->event.key.row,
             is_combo ? 254 : record->event.key.col,
             get_highest_layer(layer_state),
             record->event.pressed,
             get_mods(),
             get_oneshot_mods(),
             record->tap.count
             );
    #endif
    switch (keycode) {
    //...
    }
    return true;
}
This will print the hexadecimal representation of every key you press as well as its row and its column. Make sure to not leave any space between the commas and to end the string with a newline \n.
Additional instructions for combos
If you want to log combo key presses, there are a few more things you need to do. If you’re using the wrapper [AB_ESC] = COMBO(combo_sequence, KC_ESC), there is nothing extra that you have to do. However, here’s what you have to insert in processs_combo_event if you use the COMBO_ACTION wrapper for defining (some of) your combos:
#ifdef CONSOLE_ENABLE
    combo_t *combo = &key_combos[combo_index];
    uint8_t idx = 0;
    uint16_t combo_keycode;
    while ((combo_keycode = pgm_read_word(&combo->keys[idx])) != COMBO_END) {
        uprintf("0x%04X,%u,%u,%u,%u,0x%02X,0x%02X,0\n",
            combo_keycode,
            254,
            254,
            get_highest_layer(layer_state),
            pressed,
            get_mods(),
            get_oneshot_mods()
            /* tap_count */
        );
        idx++;
    }
#endif
As you can notice, processs_combo_event doesn’t actually give any meaningful information on the matrix position of combo key presses. This is why the row and column fields in the printed output are filled in with the “magic” constant value 254 (historically called KEYLOC_COMBO).
These “missing” constant values will be automatically filled in by the QMK Heatmap Generator based on keys you’ve typed outside of combos. For example, if you have a combo involving KC_A and KC_S, executing the combo will output these two lines:
0x004,254,254,0,1,0x00,0x00,0
0x018,254,254,0,1,0x00,0x00,0
0x004,254,254,0,0,0x00,0x00,0
0x018,254,254,0,0,0x00,0x00,0
but simply tapping those keys by themselves, one after another would produce something like:
0x004,3,2,0,1,0x00,0x00,0
0x004,3,2,0,0,0x00,0x00,0
0x018,3,3,0,1,0x00,0x00,0
0x018,3,3,0,0,0x00,0x00,0
Based on this, we can infer that the keycode 0x004 is positionned in the third row, second column and that 0x018 is positionned in the third row, third column.
Thus, if you use a key exclusively in combos, there won’t be any row,col information associated with that keycode in your keylog.csv and as such, the generator cannot infer what’s the row and column of that key and it will remain 254. This is why it helps to press every key of your keyboard at least once; to get a complete record.
At this stage, the keyboard firmware is ready to go and you can flash the firmware onto your board.
Host computer setup 
The next steps will be about setting up the host computer to listen to what the keyboard sends and actually log that output to a csv file.
To listen to your keyboard, you’ll need to install hid_listen. There are pre-compiled binaries available for download for most operating systems except for Linux 64-bit for which you’ll need to download the source code and run make at the root of the downloaded hid_listen/ folder.
Now, all you need to start logging key presses is to let this command run in the background while you’re using your keyboard normally:
UNIX system:
sudo ./hid_listen | egrep --line-buffered "(0x[A-F0-9]+,)?[0-9]+,[0-9]+,[0-9]{1,2}" | tee -a keylog.csv
Windows system (Powershell):
.\hid_listen.exe | Select-String -Pattern "(0x[A-F0-9]+,)?[0-9]+,[0-9]+,[0-9]{1,2}" | Tee-Object keylog.csv
The output should look like this:
0x6117,2,4,0,1,0x00,0x00,0
0x002A,10,0,0,1,0x01,0x00,0
0x002A,10,0,0,0,0x01,0x00,0
0x6117,2,4,0,0,0x01,0x00,0
0x6216,2,3,0,1,0x00,0x00,1
0x6216,2,3,0,0,0x00,0x00,1
Every time you press any key on your keyboard, a new line should be appended to the standard output and to the keylog.csv file which will be stored in the same directory as that of the hid_listen executable file.
If you don’t want to flood the standard output, you can replace | tee -a by >> like so:
sudo ./hid_listen | egrep --line-buffered "(0x[A-F0-9]+,)?[0-9]+,[0-9]+,[0-9]{1,2}" >> keylog.csv
This will silently append <keycode>,<row>,<col>,<layer>,<pressed>,<mod_state>,<oneshot_mod_state>,<tap_count> to keylog.csv anytime you press a key on your keyboard.
Why should I trust this web-tool with my keylogging data? 
This entire website is static and open source, meaning none of your data gets sent to any server, all the processing happens client-side and anyone can inspect the code. More importantly, the keylog.csv file that you upload to the web-tool doesn’t actually contain the keysym you’ve typed, only the raw hexadecimal keycodes.
For example, there isn’t one clear-cut keycode that will always produce “A” on screen. KC_LSHIFT followed by KC_A will produce a different keycode from S(KC_A) and yet produces the same final output nonetheless. Tapping LGUI_T(KC_A) will result in yet another hexadecimal keycode and so will LT(_LAYER, KC_A). And all of that doesn’t take into account the variability of regional OS keyboard layouts. 0x0004 would get interpreted as “a” if your OS is configured to use QWERTY but for all I know, you may as well be using AZERTY, in which case that keycode will instead output “q” or, to give another example, “ф” if you use ЙЦУКЕН.
I have no desire to deal with that ambiguous mess.
The keycodes only get used to fill in the row,col values for combo actions, so if you feel particularly paranoiac, you can delete the first column of the csv file containing the hexadecimal keycode (very easy to do in any spreadsheet application) and shuffle the order of the csv lines before uploading it. All that really matters to the generator is the row, the col, and the layer of each key press.